The first time most people need a passport photo is the worst time
to figure out how to get one. The renewal letter shows up two weeks
before your trip. The pharmacy print kiosk wants $15 and a forty
minute window. The free app you found wants an account, a
subscription, and a watermark removed in-app for $4.99.
You can get a usable, spec-compliant passport photo without any of
that — using nothing but the browser already on your phone. This
post walks through how, what the per-country rules actually
require, and the few cases where the studio is still the right
call.
The short version
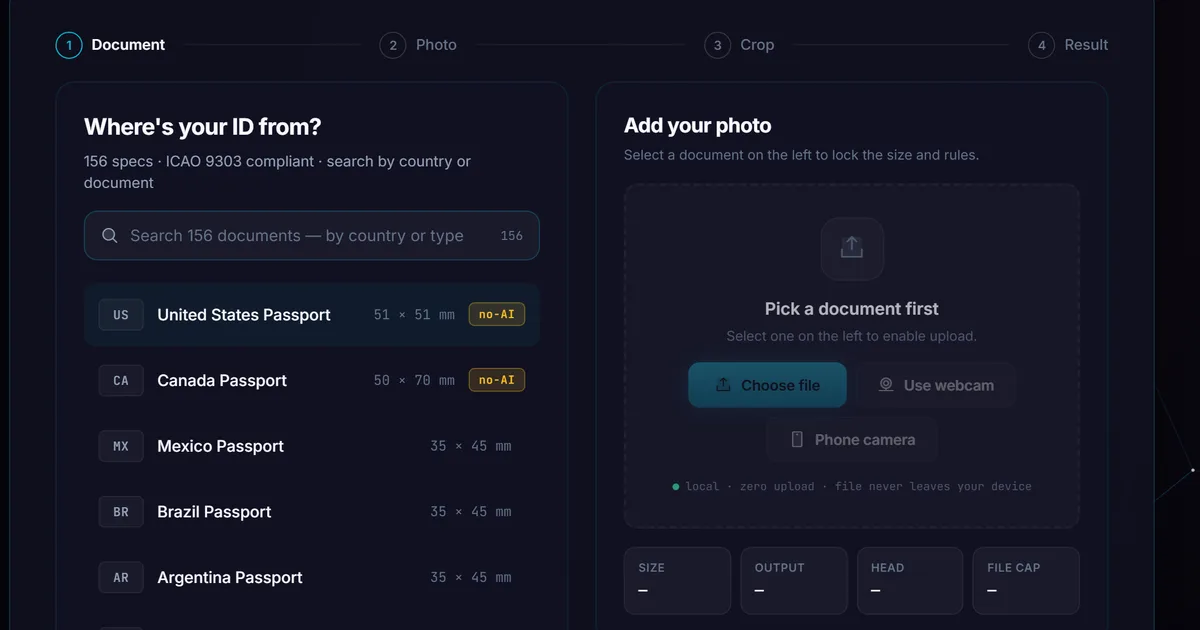
Open the ID Photo Maker on
your phone or laptop. Pick your document type from 156 document specs across major
countries, ICAO 9303 compliant — US Passport, UK, EU/Schengen,
India, Japan, China, and many more. Take a selfie with the front camera or upload an
existing photo. The tool removes the background automatically,
locks the crop to your document’s exact pixel and head-height
spec, and gives you a JPEG sized to whatever byte cap the
consulate enforces. Download. Print at any drugstore that prints
4×6 photos, or upload the JPEG file directly to the digital
application.
Zero install. Zero account. Your selfie never leaves the device —
the background removal runs on your phone, not on someone else’s
server. Same URL works on iPhone Safari, Android Chrome, an iPad,
or a desktop browser.
Why per-country presets matter
A passport photo isn’t one photo. It’s many subtly-different
photos depending on which government’s database it goes into.
A US passport photo is a 2 × 2 inch square at 600 × 600 pixels,
white background, head between 50% and 69% of frame height, JPEG
under 240 KB. A UK passport photo is a 35 × 45 mm rectangle at
413 × 531 pixels, light grey or cream background, head 29-34 mm
tall. India Passport is 51 × 51 mm at 600 × 600 pixels with a
white background and a 300 KB byte cap. Each consulate’s web
form will reject the file silently if any of these miss the spec.
A studio photographer knows these by memory for the country they
handle most often. A generic camera app does not. A “free passport
photo” tool that uploads to a server may know them or may not;
you find out when the application is rejected, which costs you
the application fee and the trip date.
What the ID Photo Maker tool
does is bake the spec into the crop. Pick “US Passport” and the
crop overlay locks to 600 × 600 with the head-height window
shaded in the safe zone. Pick “UK Passport” and the crop becomes
413 × 531 with a different safe zone. The output JPEG is encoded
at the quality level that lands just under the consulate’s byte
cap. The user doesn’t have to memorise the spec — the preset
encodes it.
How the background removal works without uploading
The hard part of an ID photo from a selfie is the background.
Studios use a physical white sheet or a controlled lighting rig.
At home you’re using whatever wall you happen to be standing next
to, which is rarely the right colour and often has shadows.
The fix is portrait matting — a small machine-learning model that
identifies the silhouette of a person against any background and
produces an alpha mask so the background can be replaced. The
model that powers Loft’s tool is MODNet, a publicly-released
portrait-matting network, compiled to a 6 MB INT8-quantized
format that runs in your browser via the @huggingface/transformers pipeline.
What that means in practice: the first time you open the tool,
your browser downloads the 6 MB model. On a 4G connection that
takes one or two seconds. The model is then cached in your
browser, so every subsequent use is offline-capable. The
inference itself runs locally — on WebGPU if your browser supports
it, on WebGL as a fallback
otherwise. A typical phone processes a selfie in two or three
seconds.
The relevant point for ID photo specifically: your selfie does
not leave your device. The model file does — once, at first run,
from our R2 CDN — but no part of your photo is uploaded anywhere
to be processed. The
pillar at /docs/how-it-works/ covers the
verification path; the short version is that you can open the
browser’s Network tab and watch the tool run without seeing your
photo in the request list.
The flow, step by step
The tool’s wizard walks through four steps. You don’t need to
memorise them; the UI guides each one. But here’s what’s
happening underneath.
Step 1 — pick the document. A scrolling list of 156 document
specs across major countries, grouped by region. Each preset locks
in the pixel dimensions, head-height percentage, default background
colour, and JPEG byte cap. The crop overlay updates as soon as you pick.
Step 2 — take a selfie or upload. On a phone, the front
camera opens directly. There’s a safe-zone overlay showing where
your head should sit. If you’ve already taken a photo (e.g. one
on iCloud Photos or in your gallery), you can upload that
instead. The tool accepts JPEG, PNG, WebP, and — importantly for
iPhone — HEIC and HEIF input, so iPhone photos work without
conversion.
Step 3 — crop and background. This is where the matting model
runs. Your photo appears with the background already removed,
sitting on top of a default solid colour. Pinch-zoom to position
the head inside the safe-zone overlay. Pick a different background
colour if the document requires one — white (most passports),
off-white, light grey (UK, several EU), or light blue (some
employee badges).
Step 4 — result. Download. The JPEG is encoded at the quality
level that lands just under your document’s byte cap. The
filename includes the preset name so you can find it later.
The whole thing is quick — the first run includes a model download; after that, subsequent uses are near-instant.
A specific note about the US State Department rule
In January 2026 the US State Department updated its photo
guidance to reject photos with AI-edited facial features. This
followed a year of reports of submissions where the applicant’s
face had been silently retouched by mobile apps.
The ID Photo Maker only segments the background — it does not
retouch the face, the skin, the eyes, or anything else about the
person. The MODNet model is a matting network, not a generative
or beautification network. It outputs an alpha mask for the
silhouette; it doesn’t redraw any part of the subject.
This is a deliberate design choice. The
US State Department photo requirements page
is the authoritative source if you need to verify anything before
submitting; this post and the tool are best-effort against
published specs, not legal advice.
What works, what doesn’t
The tool reliably produces compliant photos for:
- Adults with neutral expression and reasonable lighting.
Window light or even ceiling light is usually fine.
- Glasses-off photos for documents that require it.
Glasses-on works for documents that allow it.
- Most skin tones, hair colours, hair lengths. The matting
model handles these well. Edge cases on extremely thin or
fly-away hair sometimes produce a slight halo, fixable by
re-taking the selfie with the hair behind the shoulders.
- iPhone HEIC files, Android JPEGs, PNG screenshots, WebP
exports. Any common image format works.
- Offline use after the first run. Pin the
ID Photo Maker and the
service worker keeps the model and tool code cached.
It does not reliably produce compliant photos for:
- Photos taken in deep shadow or with extreme backlighting.
The matting model struggles when the silhouette isn’t clear
to it. Retake in better light.
- Children under 1. Infant passport photos have special rules
(eyes can be closed, parent can hold the child against a white
sheet). The current matting model isn’t tuned for infant
faces. Studio is the right call.
- Some biometric capture requirements. A handful of countries
(notably some Schengen renewal centres) require biometric
capture at the application desk — the photo you bring isn’t
used. Check before you go.
- Documents with witness requirements. UK first-time
passport photos for children need a witness who knew the child
signature on the back. The tool produces the photo; you still
need the witness.
Why this doesn’t need an app
Three things make this work without anything to install.
The first is WebAssembly, which lets the browser run the
matting model at speed comparable to a native binary. The model
is the same .onnx file native iOS and Android apps would use;
the browser just runs it in a different runtime.
The second is the Service Worker, which caches the tool and the
model after first use so the second visit is offline-capable.
You can pin the tool to your home screen via “Add to Home Screen”
on iOS or “Install App” on Android, and after that it behaves
like a native app — icon, standalone window, offline launch —
without any actual native install.
The third is that browser hardware access — camera, file picker,
gallery — has caught up with what native apps had access to. iOS
Safari can use the front camera, Android Chrome can pick from
Google Photos, both can read HEIC. The hardware no longer
favours the native path the way it used to a few years ago.
The combination means a tool that genuinely had to be a native
app five years ago can be a webpage today, and the user gets the
same outcome with substantially less friction.
When the studio is still right
There are real cases where paying the $15 at the pharmacy or
visiting the embassy-approved photographer is the right call:
- Same-day applications where rejection is catastrophic. If
you’re getting an emergency passport and you can’t afford to
have the photo bounced, pay the studio for the certainty.
- Witness-signed photos. Some children’s passports require a
witness’s signature on the photo. The studio prints
appropriately; printing a Loft-generated JPEG at home doesn’t
give you a witness.
- Biometric capture for some visas. If the application asks
you to attend a biometric appointment, the photo gets taken
there. Don’t pre-make one.
- Specific country requirements we haven’t shipped a preset
for. The presets cover most of what most people need, but
if your document needs a specific photo type we don’t list —
Pakistan’s NICOP, Russian visa, anything else — the studio
knows the spec and we may not. (Submit a
tool request and we’ll add it if there’s
demand.)
For the routine adult passport / visa / driver’s licence / student
ID case covered by the preset catalog, the browser-based approach is
the right shape. The studio is the right call for the edge
cases.
What I’d verify before printing
Three quick checks before you commit a passport photo to the
mail:
The dimensions match the consulate’s published spec. The preset
should handle this, but eyeball it against the official guide
linked from your application — a 600 × 600 file should look
square, a 35 × 45 mm file should look slightly taller than wide.
The head height is inside the spec window. The safe-zone overlay
during cropping shows the bounds. The tool doesn’t let you
download a crop that’s outside the window, but it’s worth a
final look at the downloaded JPEG.
The byte cap isn’t exceeded. The tool auto-tunes JPEG quality to
land just under the cap, but if you’ve re-saved the file through
something else after download, the size may have shifted. Check
the file size in your file manager before uploading.
That’s it. Selfie to printable JPEG, start to finish.
The ID Photo Maker is at
/tools/image-tools/id-photo-maker/. The privacy mechanism
that lets it run without uploading is covered in the
pillar at /docs/how-it-works/, section 4
specifically.